


Buying Your Club's Nonprofit Licences
What actually happens in the Microsoft 365 admin centre when you claim your club's free nonprofit licences, and how to add your club's domain afterwards.
On this page
- What changed in 2026
- Before you start
- Step 1: Sign in to the admin centre
- Step 2: Why the catalogue shows prices
- Step 3: Go in through the nonprofit portal
- Step 4: Choose how many licences
- Step 5: Check out
- Step 6: Add your club's domain
- Step 7: Decide about email before you touch MX
- Step 8: Plan accounts before you create any
- Getting help
What changed in 2026
This guide was written from a real club setup session in August 2026, because the process is not what it used to be and the old instructions no longer work.
Microsoft's nonprofit portal now carries this alert: "Microsoft 365 Business Premium and Office 365 E1 Grants were discontinued on July 1, 2026. Existing grant subscriptions are being deleted. Take action today to preserve your data."
If your club is running on a donated Business Premium or Office 365 E1 grant, that subscription is on its way out. Contact the District IT team now rather than waiting for it to stop working.
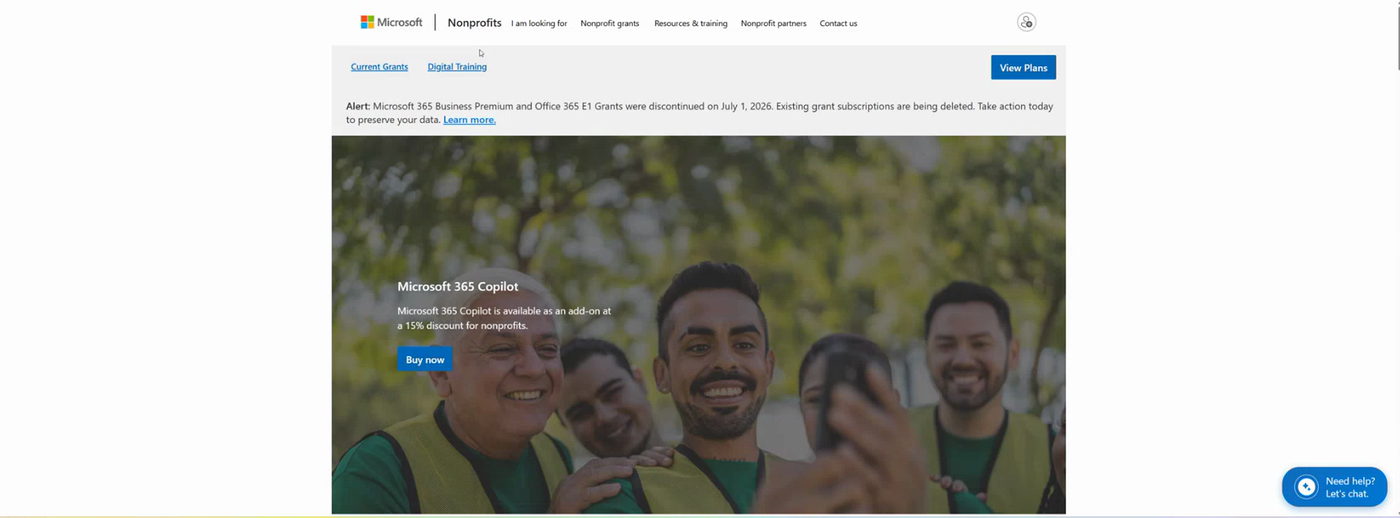
What replaces it: Microsoft 365 Business Basic, free for up to 300 users, claimed directly from Microsoft. That is the grant clubs should now be on.
The other change is the route. Microsoft has tightened how cloud solution providers (resellers) can hand out nonprofit licences. Bought through a solution provider, Business Basic is now a paid product. Bought direct from Microsoft, it is free for up to 300 people. So the Connecting Up pathway that used to be the answer is no longer the one to use for this licence.
Business Basic is the free grant: the web versions of Word, Excel, Outlook and PowerPoint, plus Teams, SharePoint, OneDrive and email. No installed desktop Office apps.
Business Standard and Business Premium add the desktop apps and extra security features. Both are paid. The district holds only a couple of Premium licences, for the roles that genuinely need the identity and fraud protection.
Before you start
You need:
- Your club's nonprofit eligibility already approved with Microsoft. See Obtaining Microsoft 365 Nonprofit for the eligibility pathways and the documents required
- The sign-in details for your club's Microsoft 365 tenant
- A credit or debit card. The balance is nil, but Microsoft will not complete the order without a payment method on file
- Ideally, the contact details of whoever manages your club's domain name, because you will need them at Step 6
Most of this is faster with someone on a call beside you. Email support@rotary9660.org.au and we will sit on a Teams call and walk through it with you. Clubs who try it alone routinely spend three times as long on the same steps.
Step 1: Sign in to the admin centre
Go to admin.microsoft.com and sign in with your club's Microsoft 365 account.
This trips up nearly everyone. Teams is just one product. The Microsoft 365 admin centre is the sun that everything else orbits. Licences, user accounts, passwords, shared mailboxes and your domain are all managed here, not in Teams.
Worth knowing too: Teams Free does not talk to Microsoft 365 Teams. If your club has been running on Teams Free, it will not interoperate with a proper tenant. That alone is a common reason clubs move.
You will be asked to set up multi-factor authentication. Security defaults are on for new tenants and they force it. Do not turn this off.
- Choose Microsoft Authenticator and follow the prompts
- If you already have the Authenticator app on your phone for another account, that is fine. It holds as many accounts as you need
- Scan the QR code with the app
- Microsoft sends a notification to your phone with a two-digit number on screen. Type that number into the app to confirm it is really you signing in
- Select Done
Full detail, with pictures, is in Set Up Multi-Factor Authentication.
Step 2: Why the catalogue shows prices
In the admin centre, go to Billing in the left menu, then Purchase services.
You will see two sections. Purchase from your solution provider lists whichever reseller your tenant is attached to. Purchase from Microsoft is the direct catalogue.
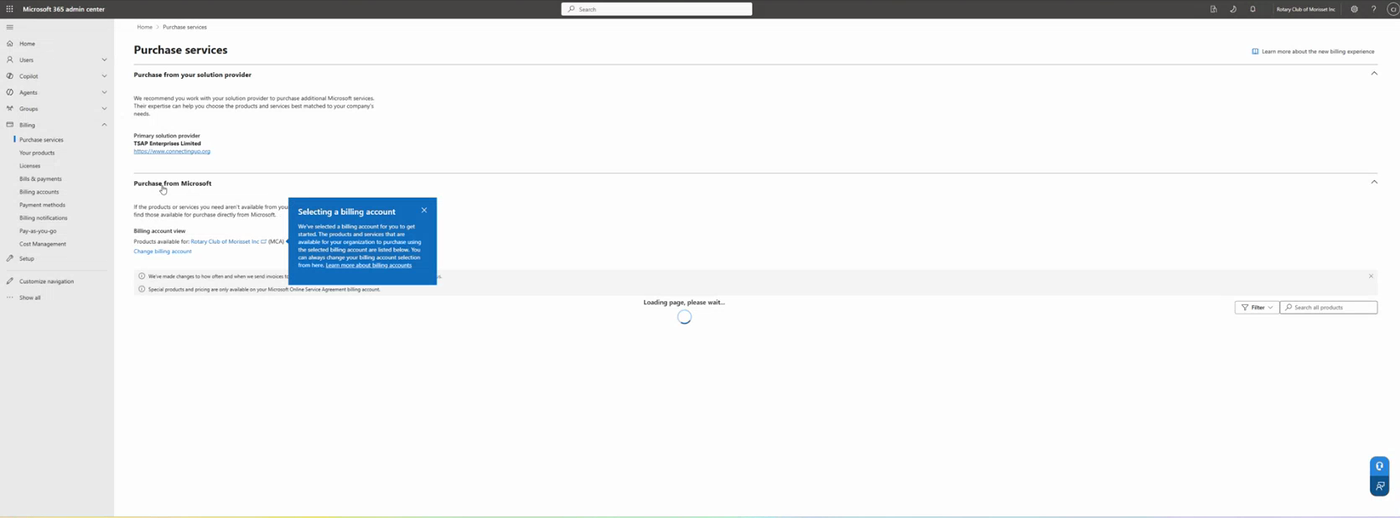
Expand Purchase from Microsoft and you get the full catalogue, and every product in it has a price against it. This is the point where most clubs conclude they have done something wrong, because they were told the licences were free.
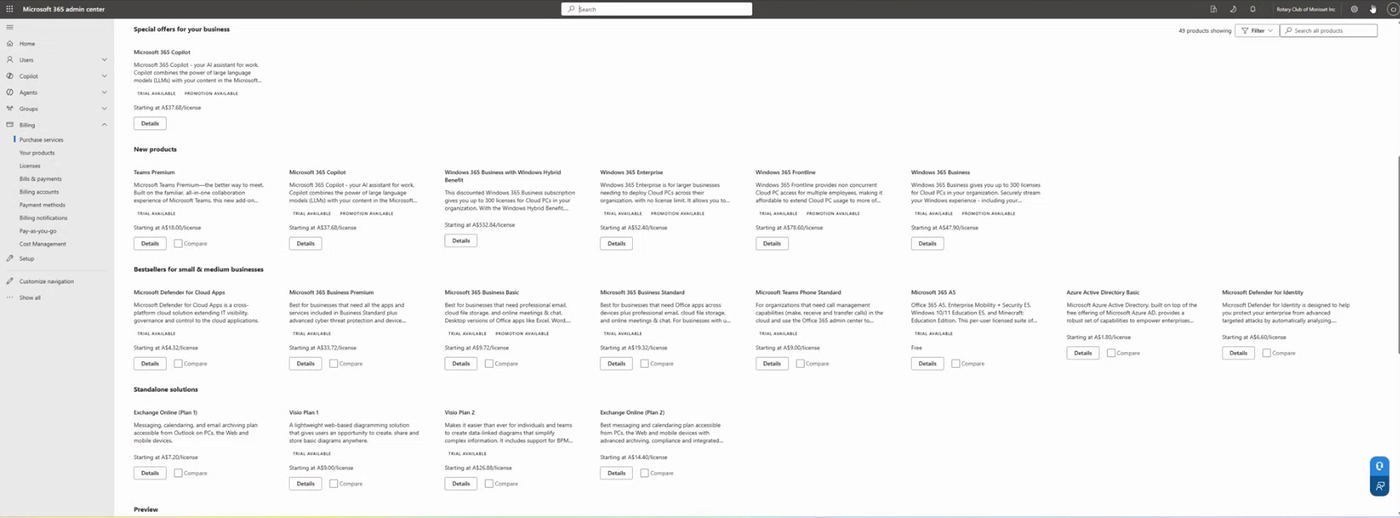
Searching the catalogue for "nonprofit" or "NFP" may find nothing. Some tenants show a Nonprofit tab in this catalogue and some do not. The club in this walkthrough had no such tab, and that is not a fault.
Do not try to fix it here. Go around it, as in the next step.
Step 3: Go in through the nonprofit portal
In a new browser tab, go to nonprofit.microsoft.com and sign in with the same account.
This portal will sometimes try to walk you into signing up as a new organisation, or offer to sign you out. If it does, use the browser back button. It is not the quickest portal on the planet and it is easy to end up going in circles.
- Select Nonprofit grants in the top navigation
- Find the Microsoft 365 Business Basic grant, the one showing 300 licences. Ignore the Copilot promotion at the top of the page
- Scroll to the plans and select Buy now
That hands you back into your own tenant's checkout, on the product page you could not reach from the catalogue.
Step 4: Choose how many licences
You land on Microsoft 365 Business Basic (Nonprofit Staff Pricing). Note the price: A$0.00 per licence per month, subtotal A$0.00.
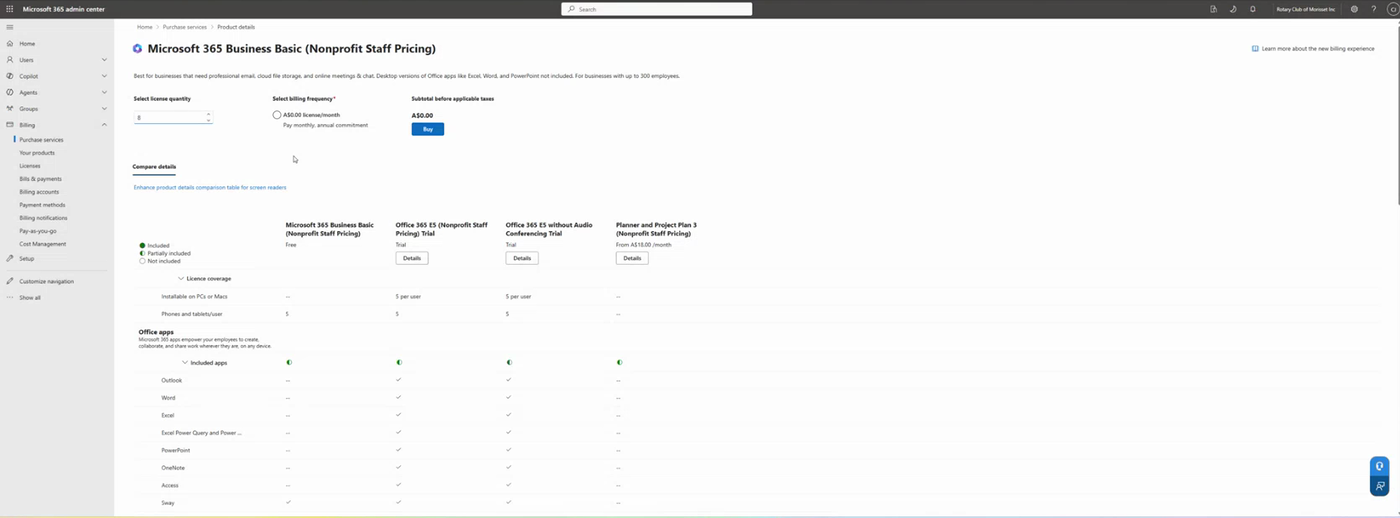
Set Select license quantity to the number of people who actually need to sign in. You can have up to 300, but take only what you need. If five roles need an account, take five. The club in this walkthrough took eight, one per board member.
The billing frequency reads "Pay monthly, annual commitment". The nil balance is genuine, but the annual commitment is real: you can increase the licence count whenever you like, and decrease it only on your renewal date, twelve months from the day you order.
So if you take 25 and only ever use 20, you carry 25 until the renewal date comes round.
Microsoft is actively cutting back nonprofit grants that sit unused. Accounts that are not signed into roughly every 30 days are treated as not in use. Another good reason to take only the licences you will genuinely use.
Step 5: Check out
Select Buy, then work through the checkout.
You will be asked for a payment method. Enter a card even though the order total is A$0.00. Microsoft will not place the order without one, and the card is not charged for this grant.
Select Place order. Expect a flurry of confirmation emails shortly afterwards.
Step 6: Add your club's domain
Your tenant starts on a Microsoft-supplied address ending in .onmicrosoft.com. To get proper club addresses, and the right domain on SharePoint and everything else, you connect your club's own domain.
You can create accounts on the default .onmicrosoft.com domain and move them later, but it is genuinely painful to swap everything over afterwards. Verify the domain first.
In the admin centre go to Settings, then Domains, then Add domain. If you cannot see Settings in the left menu, select Show all at the bottom first.
Enter your club's domain, for example yourclub.org.au, and select Use this domain.
Microsoft then asks how you want to prove you own it:
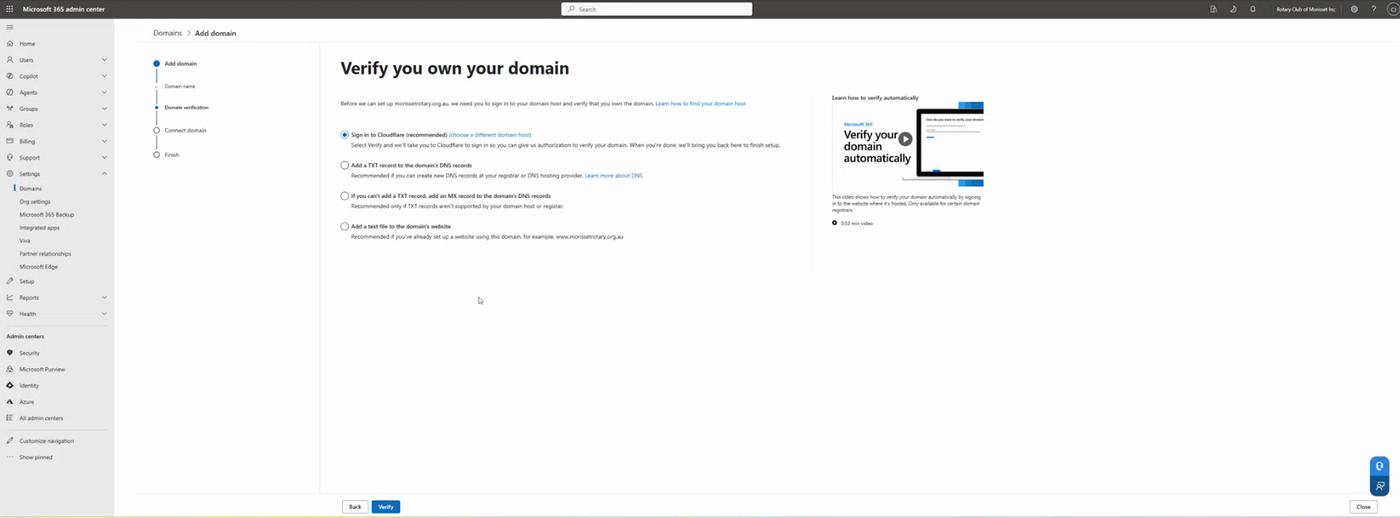
- If you have a login for the club's DNS host (Cloudflare, VentraIP, Crazy Domains, GoDaddy and so on), the sign-in option is quickest and Microsoft does the record for you
- If you do not, and most club office bearers do not, choose Add a TXT record to the domain's DNS records and select Continue
You will be shown a TXT record: a name, a value and a TTL. Take a screenshot of those three, send them to whoever manages your club's domain, and ask them to add the record. That is all they need in order to let Microsoft confirm you own the domain.
Plenty of clubs have their website and DNS with a third party, and the current board has never had the login. The District IT team can look up publicly who is hosting your DNS and your email, which usually identifies who to ask. Just email us the domain name.
Step 7: Decide about email before you touch MX
Once the domain is verified, Microsoft asks which services you want to connect. For email, that is Exchange, which is Microsoft's mail server. It then gives you a set of DNS records to add.
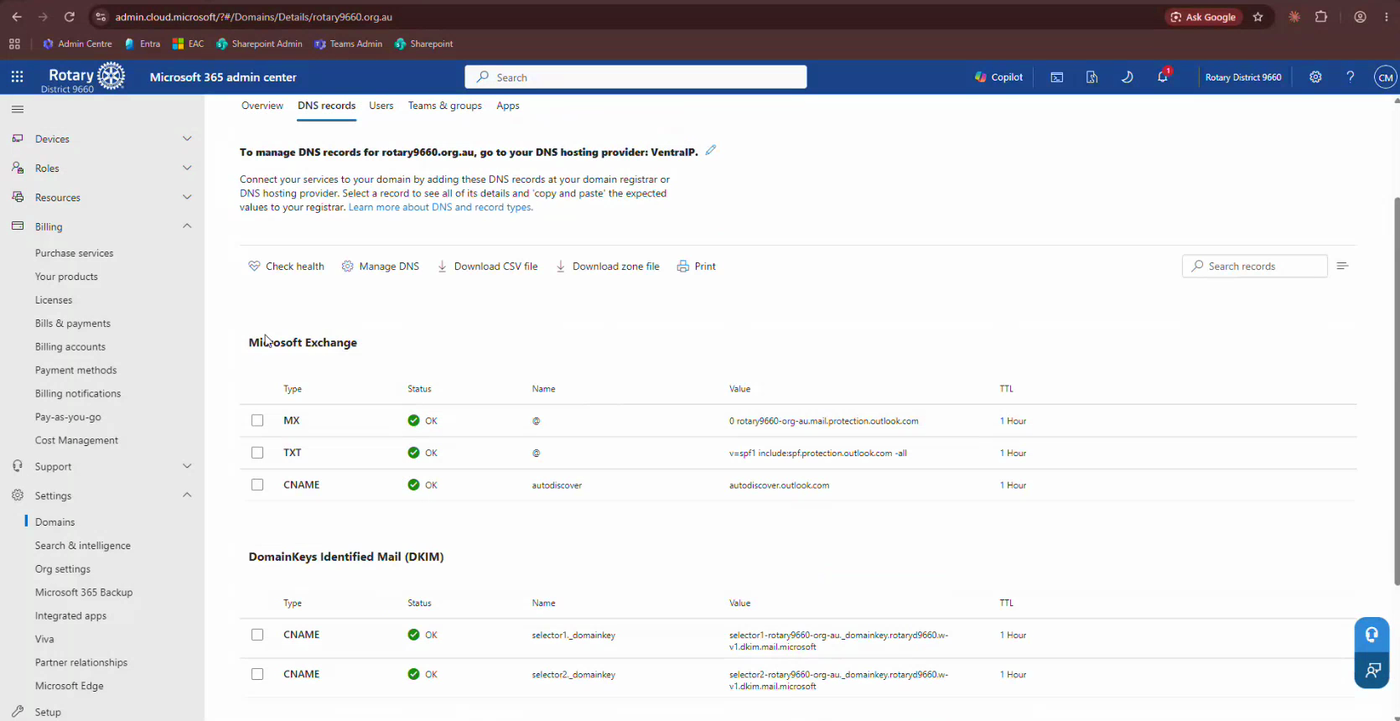
The TXT (SPF) and CNAME (autodiscover) records are the same for every tenant. The MX record, the one that actually routes your mail, is specific to your domain.
The MX change moves your club's mail from your current provider (Google Workspace, Zoho, whoever) to Microsoft 365. Before it is made:
- Create the mailboxes in Microsoft 365 first, or mail will arrive with nowhere to land
- Tell everyone using a club address that mail flow will be interrupted while it updates
This is the option most clubs do not realise they have. You can verify the domain, leave the MX record exactly where it is, and still have everyone sign in as name@yourclub.org.au and use Teams, SharePoint and OneDrive. Your email simply keeps flowing through your existing provider.
It is a perfectly valid setup and plenty of large organisations run that way. It is also a sensible staging point if your club wants to move across in its own time.
Step 8: Plan accounts before you create any
We have scripts that build the whole structure from a list of who is who in the club. Tell us the names, roles and contact details and we will run it. Doing it by hand, one dialog at a time, takes far longer and is easier to get wrong.
The structure we recommend for every club:
People get named accounts. craig.johnson@yourclub.org.au, one per person, each holding a
licence.
Roles get shared mailboxes. president@, secretary@, treasurer@, and any portfolio address
your club needs. A shared mailbox:
- Uses no licence. It is owned by the tenant, not by a person, so it costs nothing
- Does not need a shared password. People reach it from their own account
- Survives changeover. When the role passes to someone else, an admin detaches it from the outgoing person and attaches it to the incoming one. No credentials change hands and no email history is lost
That last point is the whole reason for doing it this way. Handing over a role should never mean handing over a password.
Getting help
- Email the District IT team: support@rotary9660.org.au
- Related guides: Setting Up Microsoft 365 for Your Club for the overview, Obtaining Microsoft 365 Nonprofit for eligibility, and Managing Admin Access for who should hold admin rights
We are usually around somewhere. Get your DNS records sorted, then book us in for the rest.